AWS Client VPNを設定しました
2021/07/07
ユーザーガイドのクライアント VPN の開始方法に沿ってやりました。
AWSクライアントVPNでは3つのタイプの認証が使用できます。
* Active Directory認証(ユーザーベース)
* シングルサインオン(SAMLベースのフェデレーション、ユーザーベース)
* 相互認証(証明書ベース)
このチュートリアルは、相互認証方式でした。
目次
相互認証の準備
作業しているmacOSでサーバー証明書とクライアント証明書とキーを作成して、AWS Certificate Manager(ACM)にアップロードしました。
OpenVPN easy-rsa リポジトリのクローンをローカルに作成しました。
|
1 2 3 |
git clone https://github.com/OpenVPN/easy-rsa.git cd easy-rsa/easyrsa3 |
PKI環境の初期化
|
1 2 3 4 5 |
./easyrsa init-pki init-pki complete; you may now create a CA or requests. Your newly created PKI dir is: /Users/yamashita/Documents/dev/aws-demo/easy-rsa/easyrsa3/pki |
認証局(CA)の構築
|
1 2 3 4 5 6 7 8 9 10 11 12 13 14 15 16 17 18 19 |
./easyrsa build-ca nopass Using SSL: openssl LibreSSL 2.8.3 Generating RSA private key, 2048 bit long modulus ..............................................................................................................+++ .+++ e is 65537 (0x10001) You are about to be asked to enter information that will be incorporated into your certificate request. What you are about to enter is what is called a Distinguished Name or a DN. There are quite a few fields but you can leave some blank For some fields there will be a default value, If you enter '.', the field will be left blank. ----- Common Name (eg: your user, host, or server name) [Easy-RSA CA]: CA creation complete and you may now import and sign cert requests. Your new CA certificate file for publishing is at: /Users/yamashita/Documents/dev/aws-demo/easy-rsa/easyrsa3/pki/ca.crt |
サーバー証明書とキーを生成
|
1 2 3 4 5 6 7 8 9 10 11 12 13 14 15 16 17 |
./easyrsa build-server-full server nopass Using SSL: openssl LibreSSL 2.8.3 Generating a 2048 bit RSA private key .................................................+++ .....................................................................+++ writing new private key to '/Users/yamashita/Documents/dev/aws-demo/easy-rsa/easyrsa3/pki/easy-rsa-7554.3EeQTH/tmp.SNXzzG' ----- Using configuration from /Users/yamashita/Documents/dev/aws-demo/easy-rsa/easyrsa3/pki/easy-rsa-7554.3EeQTH/tmp.Bm9qAh Check that the request matches the signature Signature ok The Subject's Distinguished Name is as follows commonName :ASN.1 12:'server' Certificate is to be certified until Oct 9 13:50:24 2023 GMT (825 days) Write out database with 1 new entries Data Base Updated |
クライアント証明書とキーを生成
|
1 2 3 4 5 6 7 8 9 10 11 12 13 14 15 16 17 |
./easyrsa build-client-full client1.domain.tld nopass Using SSL: openssl LibreSSL 2.8.3 Generating a 2048 bit RSA private key .................................................................+++ ..................................+++ writing new private key to '/Users/yamashita/Documents/dev/aws-demo/easy-rsa/easyrsa3/pki/easy-rsa-7657.bJnb3l/tmp.VFQQkr' ----- Using configuration from /Users/yamashita/Documents/dev/aws-demo/easy-rsa/easyrsa3/pki/easy-rsa-7657.bJnb3l/tmp.K9bTvQ Check that the request matches the signature Signature ok The Subject's Distinguished Name is as follows commonName :ASN.1 12:'client1.domain.tld' Certificate is to be certified until Oct 9 13:51:07 2023 GMT (825 days) Write out database with 1 new entries Data Base Updated |
ファイルの整理
|
1 2 3 4 5 6 7 8 |
mkdir ~/custom_folder/ cp pki/ca.crt ~/custom_folder/ cp pki/issued/server.crt ~/custom_folder/ cp pki/private/server.key ~/custom_folder/ cp pki/issued/client1.domain.tld.crt ~/custom_folder cp pki/private/client1.domain.tld.key ~/custom_folder/ cd ~/custom_folder/ |
ファイルの確認
|
1 2 3 4 5 6 7 8 9 10 |
ls -la total 56 drwxr-xr-x 7 yamashita staff 224 7 6 22:51 . drwxr-xr-x+ 43 yamashita staff 1376 7 6 22:51 .. -rw------- 1 yamashita staff 1172 7 6 22:51 ca.crt -rw------- 1 yamashita staff 4460 7 6 22:51 client1.domain.tld.crt -rw------- 1 yamashita staff 1704 7 6 22:51 client1.domain.tld.key -rw------- 1 yamashita staff 4552 7 6 22:51 server.crt -rw------- 1 yamashita staff 1704 7 6 22:51 server.key |
ACMへサーバー証明書とキーをアップロード
|
1 2 3 4 5 |
$ aws acm import-certificate --certificate fileb://server.crt --private-key fileb://server.key --certificate-chain fileb://ca.crt { "CertificateArn": "arn:aws:acm:us-east-1:123456789012:certificate/xxxxxxxx-59b3-4369-9d89-xxxxxxxxx" } |
ACMへクライアント証明書とキーをアップロード
|
1 2 3 4 5 |
$ aws acm import-certificate --certificate fileb://client1.domain.tld.crt --private-key fileb://client1.domain.tld.key --certificate-chain fileb://ca.crt { "CertificateArn": "arn:aws:acm:us-east-1:123456789012:certificate/xxxxxxxxx-90ab-4d22-9b13-xxxxxxxxxxx" } |
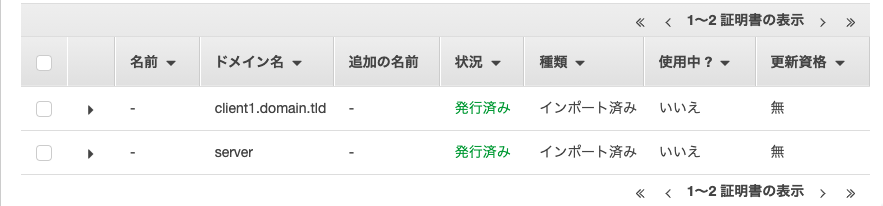
マネジメントコンソールでACMを確認すると証明書が2つ作成されていました。
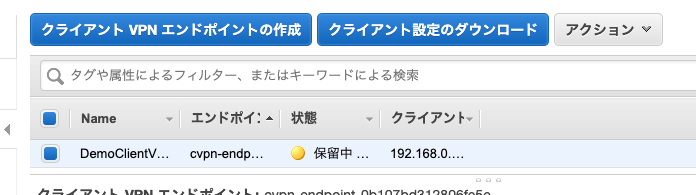
クライアントVPNエンドポイントの作成
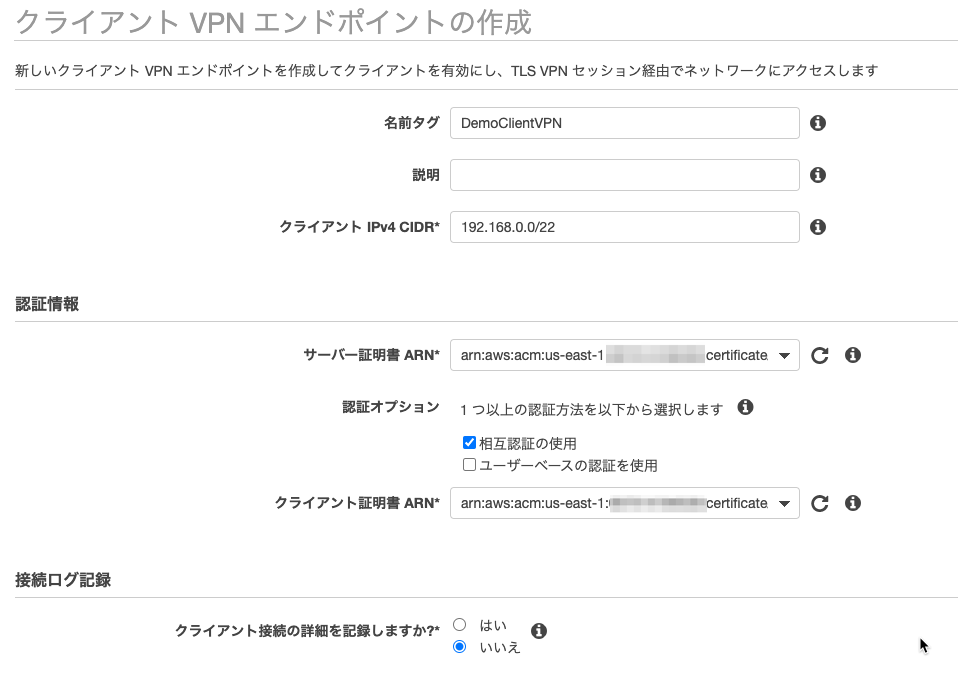
クライアントIPv4CIDRは、VPC(10.0.0.0/16)と重複しないものを設定しました。
ACMにアップロードした証明書を選択しました。
VPCサブネットへの関連付け

作成したクライアントVPNエンドポイントを選択して[関連付け]ボタンを押下しました。
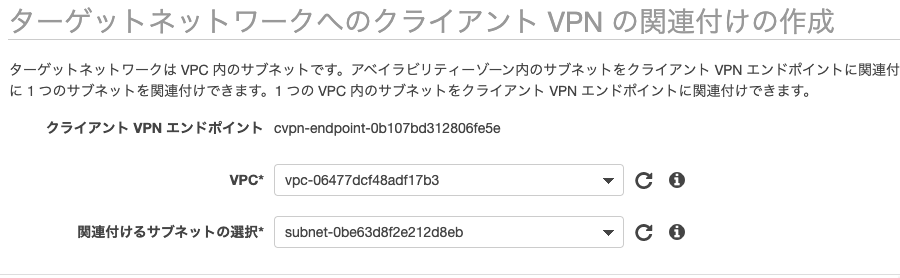
VPCとサブネットを選択しました。
高可用性を考慮するなら、もう1つですが、今回は検証目的なので1つにします。
クライアントのネットワークへのアクセスを承認
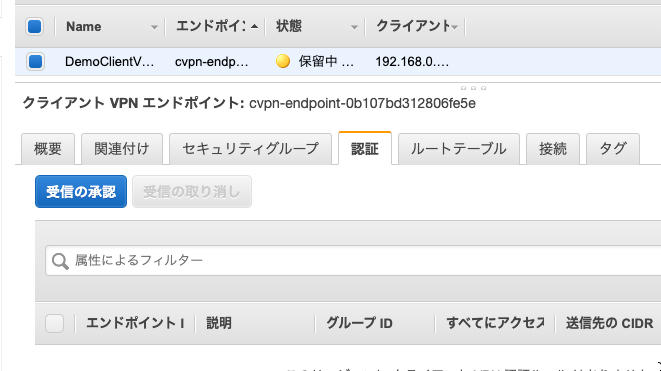
[認証]タブの[受信の承認]ボタンを押下しました。

アクセスを有効にする送信先ネットには、対象範囲を指定します。
今回はVPC全体にするので、VPCのCIDRをそのまま指定しました。
追加でインターネットに接続できるルートを設定する
これをやっておかないと、作業中のmacOSがインターネットに接続できなくなります。
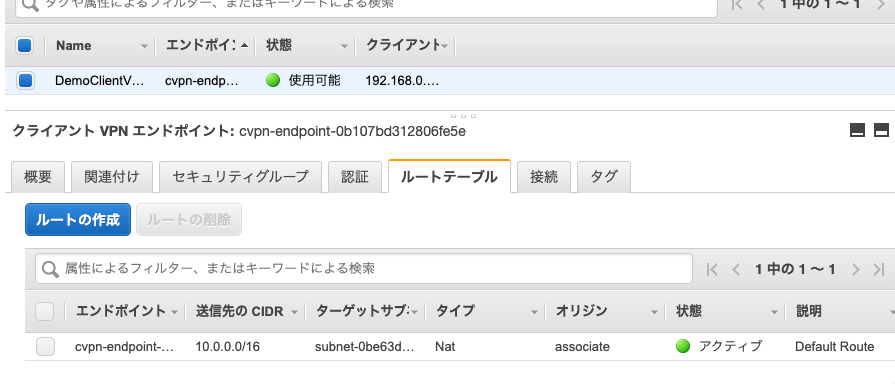
[ルートテーブル]タブの[ルートの作成]ボタンを押下しました。
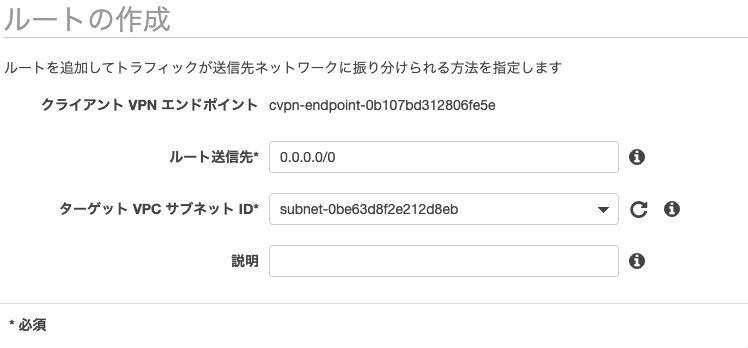
ルート送信先を指定しました。
関連付けしたサブネットIDを指定しました。
このサブネットはインターネットゲートウェイへのルートが関連付いています。
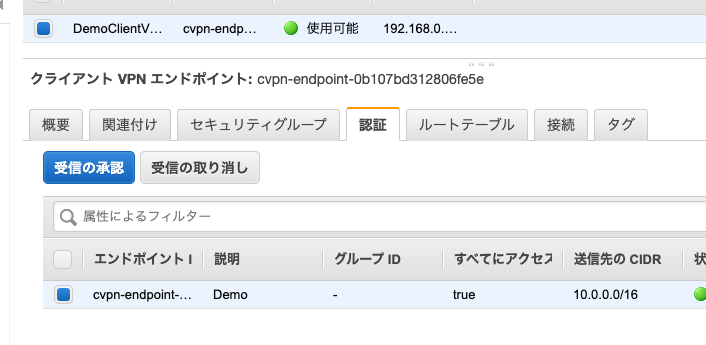
[認証]タブの[受信の承認]ボタンを押下しました。
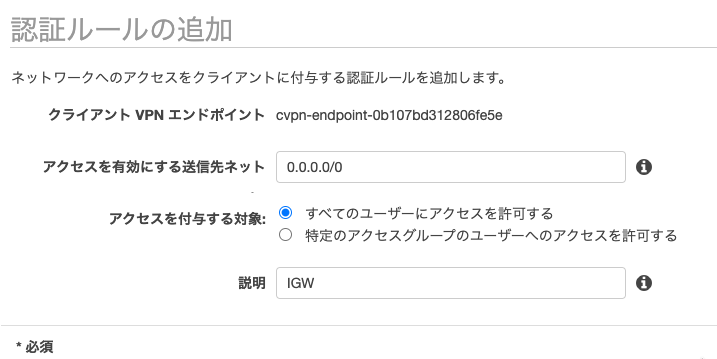
送信先ネットに0.0.0.0/0を指定しました。
設定ファイルをダウンロードする
[クライアント設定のダウンロード]ボタンを押下して設定ファイルをダウンロードしました。
|
1 2 3 4 5 6 7 8 9 10 11 12 13 14 15 16 17 18 19 20 21 22 23 24 25 26 27 |
client dev tun proto udp remote asdf.cvpn-endpoint-0011abcabcabcabc1.prod.clientvpn.eu-west-2.amazonaws.com 443 remote-random-hostname resolv-retry infinite nobind persist-key persist-tun remote-cert-tls server cipher AES-256-GCM verb 3 <ca> Contents of CA </ca> <cert> Contents of client certificate (.crt) file </cert> <key> Contents of private key (.key) file </key> reneg-sec 0 |
上記のような配置になるように、certとkeyの情報を、client1.domain.tld.crtとclient1.domain.tld.keyから取得して貼り付けました。
AWSクライアントVPNの使用
AWS Client VPN downloadからmacOS用のクライアントをダウンロードしてインストールして起動しました。
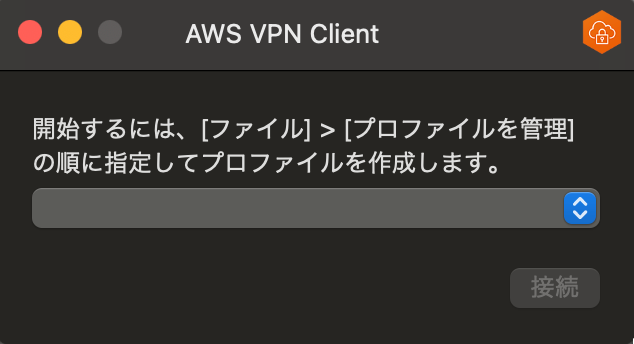
[ファイル]-[プロファイルを管理]からプロファイルを追加を選択しました。
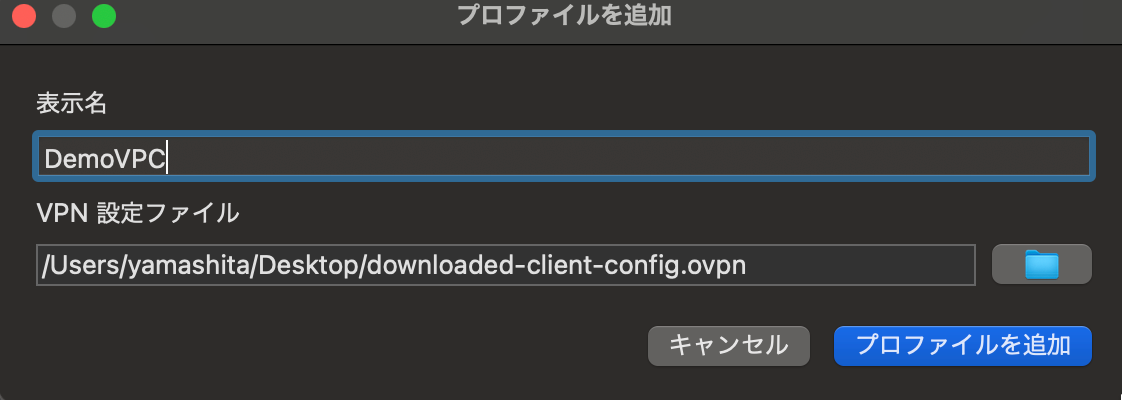
設定ファイルを選択しました。
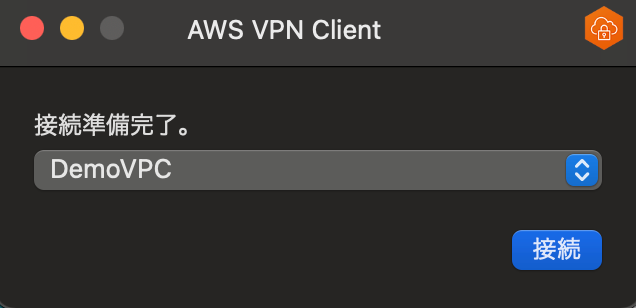
準備ができました。
マネジメントコンソールを見ると、クライアントVPNも使用可能になっていました。
[接続]ボタンを押下しました。
接続先VPCのプライベートサブネットにEC2インスタンスを起動してpingを実行したところ、返ってきました!
ping 10.0.11.106
PING 10.0.11.106 (10.0.11.106): 56 data bytes
64 bytes from 10.0.11.106: icmp_seq=0 ttl=254 time=204.618 ms
64 bytes from 10.0.11.106: icmp_seq=1 ttl=254 time=207.065 ms
64 bytes from 10.0.11.106: icmp_seq=2 ttl=254 time=232.293 ms
64 bytes from 10.0.11.106: icmp_seq=3 ttl=254 time=189.744 ms
最後までお読みいただきましてありがとうございました!
「AWS認定資格試験テキスト&問題集 AWS認定ソリューションアーキテクト - プロフェッショナル 改訂第2版」という本を書きました。
「AWS認定資格試験テキスト AWS認定クラウドプラクティショナー 改訂第3版」という本を書きました。
「ポケットスタディ AWS認定 デベロッパーアソシエイト [DVA-C02対応] 」という本を書きました。

「要点整理から攻略するAWS認定ソリューションアーキテクト-アソシエイト」という本を書きました。
「AWSではじめるLinux入門ガイド」という本を書きました。
開発ベンダー5年、ユーザ企業システム部門通算9年、ITインストラクター5年目でプロトタイプビルダーもやりだしたSoftware Engineerです。
質問はコメントかSNSなどからお気軽にどうぞ。
出来る限りなるべく答えます。
このブログの内容/発言の一切は個人の見解であり、所属する組織とは関係ありません。
このブログは経験したことなどの共有を目的としており、手順や結果などを保証するものではありません。
ご参考にされる際は、読者様自身のご判断にてご対応をお願いいたします。
また、勉強会やイベントのレポートは自分が気になったことをメモしたり、聞いて思ったことを書いていますので、登壇者の意見や発表内容ではありません。
ad
ad
関連記事
-

-
AWS Systems Manager Run CommandでEC2 Linuxのユーザーとカレントディレクトリを確認
AWS Systems Manager Run CommandからEC2 Lin …
-
-
CodeBuildで執筆原稿データをまとめた
今書いている原稿に対して編集者さんから、「できればで構わないのですが、章ごとにマ …
-
-
AWS Secrets Manager交代ユーザーローテーション
AWS Secrets Managerの交代ユーザーローテーションを確認してみま …
-
-
Backlogの実績工数をAmazon QuickSightでの可視化 – 仕組み編
Backlogの実績工数をAmazon QuickSightで可視化してわかった …
-
-
AWS WAFの個別ルールを設定する
Web ACLを選択して、[Add my own rules and rule …
-
-
AWSアカウントのルートユーザーのセキュリティ認証情報
アカウント作成時にはMFA設定するためにIAMダッシュボードからアクセスするので …
-
-
EC2スケジュールリザーブドインスタンスって終わりましたん?
ユーザーガイドのScheduled Reserved Instancesを見ると …
-
-
AWS CDK とにかくサンプルでやってみる
Cloud9でAWS CDK環境で作った環境でサンプルプロジェクトからのデプロイ …
-
-
CloudWatch LogsメトリクスフィルタでNginxのaccess_logから転送バイト数をモニタリングする
ユーザーガイドのApache ログからのフィールドの抽出を見てて、これ、Ngin …
-
-
AWS Toolkit for Eclipseをセットアップする
AWSでそろそろ課金がされつつありますので、夜中はインスタンスを自動停止して朝自 …