Amazon LinuxにRedmine 環境構築(エラーと対応をそのまま記載版)
2021/12/08
Amazon Linuxにgit + Redmineの環境を構築してみます。
自宅で構築検証したり構成したりしたものを4月より仕事場で稼働しようと思いまして。
空いた時間で場所を選ばすに作業を進められるのがIaaSのメリットかと思います。
とりあえずこの記事ではRedmineのインストールで悪戦苦闘した様をそのまま書いてます。
手順を整理してきれいにした記事は別で作成する事にします。
Amazon Linuxのインスタンスは新規で作成。
インストール手順は「Redmine 2.5をCentOS 6.5にインストールする手順」を参考にさせていただきました、というかほぼほぼそのままの手順で、うまく行かなかったとこだけ調べてなんとかします。
目次
必要パッケージのインストール
gitをインストールする
|
1 2 3 4 |
$ sudo yum install git git-all git-daemon $ git --version git version 2.1.0 |
開発ツールなどをインストールする
|
1 2 3 |
$ sudo yum groupinstall "Development Tools" $ sudo yum install openssl-devel readline-devel zlib-devel curl-devel libyaml-devel |
MySQLをインストールする
|
1 2 |
$ sudo yum install mysql-server mysql-devel |
Apacheをインストールする
|
1 2 |
$ sudo yum install httpd httpd-devel |
ImageMagickと日本語フォントのインストール
|
1 2 |
$ sudo yum install ImageMagick ImageMagick-devel ipa-pgothic-fonts |
Rubyはすでに入ってた
地味に嬉しい
|
1 2 3 |
$ ruby -v ruby 2.0.0p598 (2014-11-13 revision 48408) [x86_64-linux] |
bundlerをインストールする
|
1 2 |
$ sudo gem install bundler --no-rdoc --no-ri |
MySQLの設定
デフォルトキャラクタセットをUTF-8にする
|
1 2 |
$ sudo vim /etc/my.cnf |
|
1 2 3 4 5 6 7 8 9 10 11 12 13 14 |
[mysqld] datadir=/var/lib/mysql socket=/var/lib/mysql/mysql.sock symbolic-links=0 character-set-server=utf8 [mysqld_safe] log-error=/var/log/mysqld.log pid-file=/var/run/mysqld/mysqld.pid [mysql] default-character-set=utf8 |
MySQLの自動起動設定してとりあえず起動
|
1 2 3 4 5 6 7 8 9 10 11 12 13 14 15 16 17 18 19 20 21 22 23 24 25 26 27 28 29 30 31 32 33 34 35 |
$ sudo chkconfig mysqld on $ sudo service mysqld Initializing MySQL database: Installing MySQL system tables... OK Filling help tables... OK To start mysqld at boot time you have to copy support-files/mysql.server to the right place for your system PLEASE REMEMBER TO SET A PASSWORD FOR THE MySQL root USER ! To do so, start the server, then issue the following commands: /usr/bin/mysqladmin -u root password 'new-password' /usr/bin/mysqladmin -u root -h ip-172-31-10-117 password 'new-password' Alternatively you can run: /usr/bin/mysql_secure_installation which will also give you the option of removing the test databases and anonymous user created by default. This is strongly recommended for production servers. See the manual for more instructions. You can start the MySQL daemon with: cd /usr ; /usr/bin/mysqld_safe You can test the MySQL daemon with mysql-test-run.pl cd /usr/mysql-test ; perl mysql-test-run.pl Please report any problems at http://bugs.mysql.com/ Starting mysqld: [ OK ] |
MySQL初期設定ツールの実行
|
1 2 |
$ sudo mysql_secure_installation |
- Enter current password for root (enter for none): 初期状態でrootのパスワード設定はないのでそのまま[Enter]
- Set root password? [Y/n] rootのパスワード設定なのでyにして設定
- Remove anonymous users? [Y/n] anonymous ユーザの削除なのでyで削除
- Disallow root login remotely? [Y/n] rootユーザの接続をローカルに限定するかどうか
- Remove test database and access to it? [Y/n] テスト用データベースを削除するかどうか
- Reload privilege tables now? [Y/n] 設定を即時反映するかどうかなのでyで反映
Redmine用MySQLユーザとデータベースの作成
|
1 2 3 4 5 6 |
$ sudo mysql -uroot -p mysql> create database db_redmine default character set utf8; mysql> grant all on db_redmine.* to user_redmine@localhost identified by '********'; mysql> flush privileges; mysql> exit; |
Redmineのインストール
Redmine 3.0.0をダウンロードして/var/lib/redmineに展開する
|
1 2 3 4 |
$ curl -O http://www.redmine.org/releases/redmine-3.0.0.tar.gz $ tar xvf redmine-3.0.0.tar.gz $ sudo mv redmine-3.0.0 /var/lib/redmine |
Redmineからデータベースへの接続設定ファイルを作成する
|
1 2 3 |
$ cd /var/lib/redmine $ sudo vim config/database.yml |
|
1 2 3 4 5 6 7 8 |
production: adapter: mysql2 database: db_redmine host: localhost username: user_redmine password: *********** encoding: utf8 |
設定ファイル config/configuration.yml を作成する
|
1 2 |
$ sudo vim config/configuration.yml |
|
1 2 3 4 5 6 7 8 9 10 |
production: email_delivery: delivery_method: :smtp smtp_settings: address: "localhost" port: 25 domain: 'domain.com' rmagick_font_path: /usr/share/fonts/ipa-pgothic/ipagp.ttf |
Gemパッケージをインストールする
mkmf.rb can’t find header files for ruby at /usr/share/ruby/include/ruby.h
まずbundle installを実行して上記のエラーが発生してちょいはまる。
ruby-develを先にインストールしなければならないらしいのでそれで解決。
|
1 2 3 |
$ sudo yum install ruby-devel $ bundle install --without development test |
Redmineの初期設定
|
1 2 3 4 |
$ cd /var/lib/redmine $ bundle exec rake generate_secret_token $ RAILS_ENV=production bundle exec rake db:migrate |
Passengerのインストール
PassengerとPassengerのApache用モジュールをインストールする
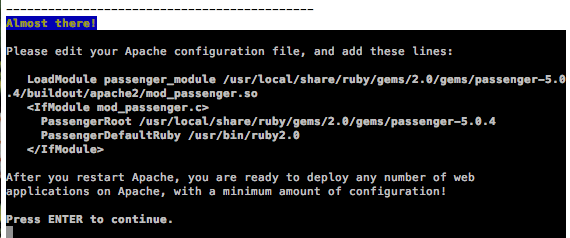
sudo passenger-install-apache2-moduleではパスが通らず、sudoなしで実行したら、やっぱりパーミッションエラーで、その時に表示されたメッセージ通りのコマンドで最終的には実行しました。
|
1 2 3 4 5 6 |
$ sudo gem install passenger --no-rdoc --no-ri $ export ORIG_PATH="$PATH" $ sudo -s -E # export PATH="$ORIG_PATH" # passenger-install-apache2-module |
[Enter]を押してって実行。
途中の興味のある言語では、デフォルトの「Ruby」と「python」だけでなく「node.js」も追加で選びました。
It looks like something went wrong
「何かが間違っていたように見えます」ですと。
よく見ると次のメッセージが。
virtual memory exhausted: メモリを確保できません
そういえば、EC2のインスタンスタイプがt2.micro(Memory 1G)なのでt2.small(Memory 2G)に変更して2行目のexportから再実行。
[Enter]を押してって実行。
途中の興味のある言語では、デフォルトの「Ruby」と「python」だけでなく「node.js」も改めて追加で選びました。
完了です。
続いて書かれているとおりApacheの設定をします。
Apacheの設定
passenger.confを作成する
設定内容を再確認してテキストエディタにコピーします。
|
1 2 3 4 5 6 7 |
# passenger-install-apache2-module --snippet LoadModule passenger_module /usr/local/share/ruby/gems/2.0/gems/passenger-5.0.4/buildout/apache2/mod_passenger.so <IfModule mod_passenger.c> PassengerRoot /usr/local/share/ruby/gems/2.0/gems/passenger-5.0.4 PassengerDefaultRuby /usr/bin/ruby2.0 </IfModule> |
ec2-userに戻って/etc/httpd/conf.d/passenger.confを作成します。
|
1 2 3 |
# exit $ sudo vim /etc/httpd/conf.d/passenger.conf |
記述内容
Header以降の任意パラメータはとりあえず。
チューニングなど設定がまずければ後で変更します。
「RackBaseURI /redmine」はサブディレクトリで実行するための設定です。
|
1 2 3 4 5 6 7 8 9 10 11 12 13 14 15 16 17 18 19 20 21 22 |
LoadModule passenger_module /usr/local/share/ruby/gems/2.0/gems/passenger-5.0.4/buildout/apache2/mod_passenger.so <IfModule mod_passenger.c> PassengerRoot /usr/local/share/ruby/gems/2.0/gems/passenger-5.0.4 PassengerDefaultRuby /usr/bin/ruby2.0 </IfModule> RackBaseURI /redmine Header always unset "X-Powered-By" Header always unset "X-Rack-Cache" Header always unset "X-Content-Digest" Header always unset "X-Runtime" PassengerMaxPoolSize 20 PassengerMaxInstancesPerApp 4 PassengerPoolIdleTime 3600 PassengerHighPerformance on PassengerStatThrottleRate 10 PassengerSpawnMethod smart RailsAppSpawnerIdleTime 86400 PassengerMaxPreloaderIdleTime 0 |
Apache上のPassengerでRedmineを実行するための設定をする
今回はサブディレクトリで実行するように設定しました。
|
1 2 3 |
$ sudo chown -R apache:apache /var/lib/redmine $ sudo ln -s /var/lib/redmine/public /var/www/html/redmine |
Apacheを起動して自動起動も設定する
|
1 2 3 |
$ sudo service httpd start $ sudo chkconfig httpd on |
動作確認
We’re sorry, but something went wrong.
意気揚々とhttp://<IPアドレス>/redmine で確認したら、
「We’re sorry, but something went wrong.」の表示が。
検索したら「RailsEnv development」を設定ファイルに追加するらしい。
なので、passenger.confに追加してapache再起動
|
1 2 3 |
$ sudo vim /etc/httpd/conf.d/passenger.conf $ sudo service httpd restart |
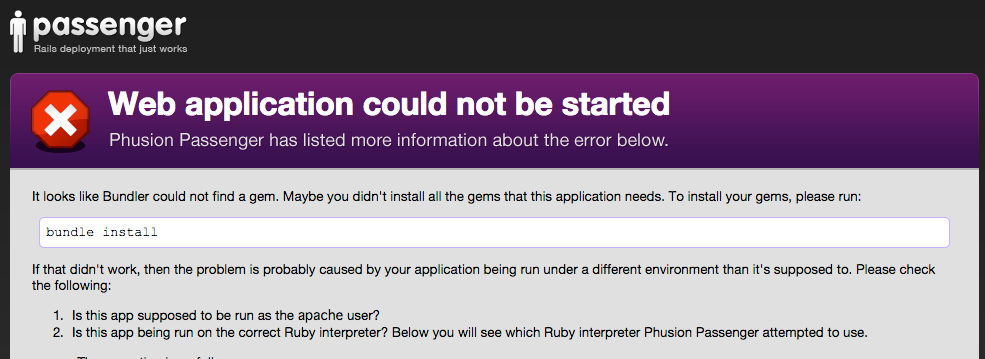
Web applcation could not be started
Could not find i18n-0.7.0 in any of the sources
続いて「Web applcation could not be started」
エラー内容
|
1 2 3 4 5 6 7 8 9 10 11 12 13 14 15 16 17 18 19 20 21 22 23 24 |
-------- The exception is as follows: ------- Could not find i18n-0.7.0 in any of the sources (Bundler::GemNotFound) /usr/local/share/ruby/gems/2.0/gems/bundler-1.8.4/lib/bundler/spec_set.rb:92:in `block in materialize' /usr/local/share/ruby/gems/2.0/gems/bundler-1.8.4/lib/bundler/spec_set.rb:85:in `map!' /usr/local/share/ruby/gems/2.0/gems/bundler-1.8.4/lib/bundler/spec_set.rb:85:in `materialize' /usr/local/share/ruby/gems/2.0/gems/bundler-1.8.4/lib/bundler/definition.rb:132:in `specs' /usr/local/share/ruby/gems/2.0/gems/bundler-1.8.4/lib/bundler/definition.rb:177:in `specs_for' /usr/local/share/ruby/gems/2.0/gems/bundler-1.8.4/lib/bundler/definition.rb:166:in `requested_specs' /usr/local/share/ruby/gems/2.0/gems/bundler-1.8.4/lib/bundler/environment.rb:18:in `requested_specs' /usr/local/share/ruby/gems/2.0/gems/bundler-1.8.4/lib/bundler/runtime.rb:13:in `setup' /usr/local/share/ruby/gems/2.0/gems/bundler-1.8.4/lib/bundler.rb:122:in `setup' /usr/local/share/ruby/gems/2.0/gems/bundler-1.8.4/lib/bundler/setup.rb:18:in `<top (required)>' /usr/share/ruby/vendor_ruby/2.0/rubygems/core_ext/kernel_require.rb:135:in `require' /usr/share/ruby/vendor_ruby/2.0/rubygems/core_ext/kernel_require.rb:135:in `rescue in require' /usr/share/ruby/vendor_ruby/2.0/rubygems/core_ext/kernel_require.rb:144:in `require' /usr/local/share/ruby/gems/2.0/gems/passenger-5.0.4/lib/phusion_passenger/loader_shared_helpers.rb:278:in `block in run_load_path_setup_code' /usr/local/share/ruby/gems/2.0/gems/passenger-5.0.4/lib/phusion_passenger/loader_shared_helpers.rb:381:in `running_bundler' /usr/local/share/ruby/gems/2.0/gems/passenger-5.0.4/lib/phusion_passenger/loader_shared_helpers.rb:276:in `run_load_path_setup_code' /usr/local/share/ruby/gems/2.0/gems/passenger-5.0.4/helper-scripts/rack-preloader.rb:99:in `preload_app' /usr/local/share/ruby/gems/2.0/gems/passenger-5.0.4/helper-scripts/rack-preloader.rb:157:in `<module:App>' /usr/local/share/ruby/gems/2.0/gems/passenger-5.0.4/helper-scripts/rack-preloader.rb:29:in `<module:PhusionPassenger>' /usr/local/share/ruby/gems/2.0/gems/passenger-5.0.4/helper-scripts/rack-preloader.rb:28:in `<main>' |
bundleをもう一度インストールしてみる。
|
1 2 3 |
$ cd /var/lib/redmine $ bundle install --without development test |
「Unknown database adapter adapter found in config/database.yml, use Gemfile.local to load your own database gems
Unknown database adapter adapter found in config/database.yml, use Gemfile.local to load your own database gems」
database.ymlをコピペではなくちゃんと書いてみる。
|
1 2 |
$ sudo vim config/database.yml |
そしてもう一度実行
|
1 2 |
$ bundle install --without development test |
「There was an error while trying to write to Gemfile.lock. It is likely that
you need to allow write permissions for the file at path:
/var/lib/redmine/Gemfile.lock」
確認
|
1 2 3 |
$ ll Gemfile.lock -rw-rw-r-- 1 apache apache 4314 3月 9 14:55 Gemfile.lock |
素直に権限を付けてみる
|
1 2 3 4 |
$ sudo chmod 666 Gemfile.lock $ ll Gemfile.lock -rw-rw-rw- 1 apache apache 4314 3月 9 14:55 Gemfile.lock |
そしてもう一度実行
|
1 2 |
$ bundle install --without development test |
「Bundle complete! 27 Gemfile dependencies, 49 gems now installed.
Gems in the groups development and test were not installed.
Use bundle show [gemname] to see where a bundled gem is installed.」
きれいにインストールできたようです。
とりあえずOSごと再起動。
まだ変わらない。
bundle以降の手順を再確認してみると、「$ RAILS_ENV=production bundle exec rake db:migrate」でまず
「Rails Error: Unable to access log file. Please ensure that /var/lib/redmine/log/production.log exists and is writable」のエラー
|
1 2 3 |
$ sudo chmod 666 /log/production.log $ RAILS_ENV=production bundle exec rake db:migrate |
次に「Errno::EACCES: Permission denied – /var/lib/redmine/db/schema.rb」
もうなんだかパーミッションエラー地獄です。
rootがbundleを実行できないのが問題なのでしょうか。
とりあえず1つづつ対応していく。
|
1 2 3 |
$ sudo chmod 777 db $ RAILS_ENV=production bundle exec rake db:migrate |
まだ変わらず。
よくよくエラーメッセージを見ていると、「development」で何かが見つからないって言われているようです。
なので、withoutをやめてみて順番に実行する。
|
1 2 3 4 5 6 7 8 9 |
$ cd /var/lib/redmine $ sudo -s -E # bundle install --without test # exit $ bundle install --without test $ sudo vim config/database.yml $ bundle exec rake generate_secret_token $ RAILS_ENV=development bundle exec rake db:migrate |
database.ymlに追加した内容
|
1 2 3 4 5 6 7 8 |
development: adapter: mysql2 database: db_redmine host: localhost username: user_redmine password: ************ encoding: utf8 |
やっと起動した!
使っていて問題があるかもしれませんがとりあえずはインストール完了!!!!
adminのパスワードだけ変えておきます。
(初期パスワードは全世界共通 adminなので。)
2015/11/15 追記
この環境、Railsの実行環境がproductionでうまく起動しなくて、developmentにして起動した、というだけという事にいまさらながら気が付きました。
後々のプラグインインストールとかも含めてやり直さないとなーと思ってます。
最後までお読みいただきましてありがとうございました!
「AWS認定資格試験テキスト&問題集 AWS認定ソリューションアーキテクト - プロフェッショナル 改訂第2版」という本を書きました。
「AWS認定資格試験テキスト AWS認定クラウドプラクティショナー 改訂第3版」という本を書きました。
「ポケットスタディ AWS認定 デベロッパーアソシエイト [DVA-C02対応] 」という本を書きました。

「要点整理から攻略するAWS認定ソリューションアーキテクト-アソシエイト」という本を書きました。
「AWSではじめるLinux入門ガイド」という本を書きました。

開発ベンダー5年、ユーザ企業システム部門通算9年、ITインストラクター5年目でプロトタイプビルダーもやりだしたSoftware Engineerです。
質問はコメントかSNSなどからお気軽にどうぞ。
出来る限りなるべく答えます。
このブログの内容/発言の一切は個人の見解であり、所属する組織とは関係ありません。
このブログは経験したことなどの共有を目的としており、手順や結果などを保証するものではありません。
ご参考にされる際は、読者様自身のご判断にてご対応をお願いいたします。
また、勉強会やイベントのレポートは自分が気になったことをメモしたり、聞いて思ったことを書いていますので、登壇者の意見や発表内容ではありません。
ad
ad
関連記事
-

-
Amazon Glacierのプロビジョニングされた迅速取り出し容量をなぜか購入しました
過去1年ぐらいのAWSコストをCost Explorerで見てまして、10/10 …
-

-
AWS Organizationsでアカウントを50作って指定したOUに移動するスクリプト
AWS Organizationsでアカウントを50個作る必要がありましたので、 …
-

-
前からできましたっけ??CloudWatch Logsの保持設定を複数まとめて設定
AWSの個人アカウントで要らなさそうなリソースの断捨離をしてます。 CloudW …
-

-
「AWS認定資格試験テキスト AWS認定クラウドプラクティショナー」を執筆いたしました
「AWS認定資格試験テキスト AWS認定クラウドプラクティショナー」という本の第 …
-

-
AWS KMSのキーポリシーとアイデンティティベースポリシー
AWS KMSのCMKを作成する際に、管理者とキーユーザーを選択することで、以下 …
-

-
JAWS FESTA 2017 Reverse X re:Birth
JAWS FESTA 2017 中四国 今年はブログタイトル「JAWS FEST …
-

-
Application Load Balancer スティッキーセッションでどれぐらい偏るかを偶然見ました
Amazon Linux2のPHPを7.2から7.3へアップデートしましたでアッ …
-

-
「re:CAP ~サーバーワークス re:Invent 2018 報告会~」でre:Invent2018について思われたことを聞かせていただいた
サーバーワークスさんのre:Invent re:CAPにおじゃましました。 re …
-

-
EC2 Dedicated Hosts(専有ホスト)を起動
クォータ引き上げ 新規で作成したアカウントではDedicated Hostsがソ …
-

-
AWS CodeBuildのチュートリアルをやってみました
こちらユーザーガイドの最初の方にあるチュートリアルです。 コンソールを使用した …


