
AWS Application Discovery Serviceのエージェントを実行
2021/09/02
本来はオンプレミスのサーバーにエージェントをインストールして、自動でアプリケーション情報などを生成して、移行の計画に役立てるAWS Application Discovery Serviceですが、試したかっただけなので、EC2で実行してみました。
当ブログを起動中のEC2インスタンスで試してみました。

どのEC2インスタンスにセットアップしたかわからなくなったら困るのでタグ付けしておきました。
対象のEC2インスタンスはAmazon Linux2です。
|
1 2 3 4 5 6 7 8 9 10 11 |
$ cat /etc/os-release NAME="Amazon Linux" VERSION="2" ID="amzn" ID_LIKE="centos rhel fedora" VERSION_ID="2" PRETTY_NAME="Amazon Linux 2" ANSI_COLOR="0;33" CPE_NAME="cpe:2.3:o:amazon:amazon_linux:2" HOME_URL="https://amazonlinux.com/" |
参照したユーザーガイドはLinux にエージェントをインストールするです。
目次
IAMポリシー
専用のIAMユーザーを作成して、IAM管理ポリシーAWSApplicationDiscoveryAgentAccessをアタッチしました。
アクセスキーIDをシークレットアクセスキーを発行しておきました。
オンプレミスのサーバーで起動させる前提です。
AWS Application Discovery Serviceエージェントのインストール
|
1 2 |
$ curl -o ./aws-discovery-agent.tar.gz https://s3-us-west-2.amazonaws.com/aws-discovery-agent.us-west-2/linux/latest/aws-discovery-agent.tar.gz |
エージェントのアーカイブファイルをダウンロードしました。
|
1 2 3 4 5 6 7 8 9 10 11 12 |
$ curl -o ./agent.sig https://s3.us-west-2.amazonaws.com/aws-discovery-agent.us-west-2/linux/latest/aws-discovery-agent.tar.gz.sig $ curl -o ./discovery.gpg https://s3.us-west-2.amazonaws.com/aws-discovery-agent.us-west-2/linux/latest/discovery.gpg $ gpg --no-default-keyring --keyring ./discovery.gpg --verify agent.sig aws-discovery-agent.tar.gz gpg: Signature made Tue Jun 29 22:09:30 2021 UTC gpg: using RSA key 5133255E4DF42DA2 gpg: directory '/home/ssm-user/.gnupg' created gpg: /home/ssm-user/.gnupg/trustdb.gpg: trustdb created gpg: Good signature from "AWS Application Discovery Service <aws-application-discovery-service@amazon.com>" [unknown] gpg: WARNING: This key is not certified with a trusted signature! gpg: There is no indication that the signature belongs to the owner. Primary key fingerprint: 7638 F24C 6717 F97C 4F1B 3BC0 5133 255E 4DF4 2DA2 |
署名ファイルをダウンロードして、インストールパッケージの暗号署名の確認をしました。
Good signatureとなっているので正しい署名が確認できました。
これが不正な場合はBad signatureになります。
|
1 2 |
$ tar -xzf aws-discovery-agent.tar.gz |
展開しました。
|
1 2 3 4 5 6 7 8 |
$ ls -1 agent.sig aws-discovery-agent.deb aws-discovery-agent.rpm aws-discovery-agent.tar.gz discovery.gpg install |
展開後のディレクトリ内はこのようになっていました。
|
1 2 |
$ sudo bash install -r ap-northeast-1 -k aws-access-key-id -s aws-secret-access-key |
IAMユーザーのアクセスキーとシークレットアクセスキーをセットして実行しました。
|
1 2 3 4 5 6 7 8 9 10 11 12 13 14 15 16 17 18 19 20 21 22 23 24 25 26 27 28 29 30 31 32 33 34 35 36 37 38 |
AWS region option specified as: us-east-1. AWS key ID option specified as: XXXXXXXXXXXXXXX. AWS key secret option specified. ************************************************** INIT PHASE ************************************************** Distribution type of the machine is amzn. Distribution of the machine is Amazon Linux. Revision of the distribution is 2. There is no existing version of the AWS Discovery Agent on the machine. Using rpm and yum for package management. Expected agent package name is aws-discovery-agent.rpm. Installing using local file /home/ssm-user/aws-discovery-agent.rpm ************************************************** INSTALL AGENT PHASE ************************************************** Installing agent with rpm... Created symlink from /etc/systemd/system/multi-user.target.wants/aws-discovery-daemon.service to /usr/lib/systemd/system/aws-discovery-daemon.service. Validating install arguments and writing configuration to /etc/opt/aws/discovery/config ************************************************** FINISH PHASE ************************************************** Notice: By installing the Amazon Discovery Agent, you agree that your use is subject to the terms of your existing AWS Customer Agreement or other agreement with Amazon Web Services, Inc. or its affiliates governing your use of AWS services. You may not install and use the Amazon Discovery Agent unless you have an account in good standing with AWS. * * * Current running agent reports version as: 2.0.1943.0 This install script was created to install agent version: 2.0.1943.0 In most cases, these version numbers should be the same. |
うまくいったみたいです。
|
1 2 3 4 5 6 7 8 9 10 11 |
$ sudo systemctl status aws-discovery-daemon.service ● aws-discovery-daemon.service - AWS Discovery Agent: Collects system configuration and usage statistics for AWS Discovery. Loaded: loaded (/usr/lib/systemd/system/aws-discovery-daemon.service; enabled; vendor preset: disabled) Active: active (running) since Sun 2021-08-15 03:05:34 UTC; 48s ago Main PID: 20389 (aws-discoveryd) CGroup: /system.slice/aws-discovery-daemon.service └─20389 /opt/aws/discovery/aws-discoveryd nodaemon Aug 15 03:05:34 ip-10-0-2-86.ap-northeast-3.compute.internal systemd[1]: Started AWS Discovery Agent: Collects system configuration and u...ery.. Hint: Some lines were ellipsized, use -l to show in full. |
エージェントの実行を確認しました。
|
1 2 |
$ sudo tail -f -n 100 /var/log/aws/discovery/aws-discovery-daemon-0.log |
ログを見てみます。
|
1 2 3 4 5 |
2021-08-15 03:06:23 info [0xf7195d88] Arsenal endpoint is "https://arsenal-discovery.us-east-1.amazonaws.com". 2021-08-15 03:06:24 info [0xf7195d88] Registration failed.; Rejecting registration in us-east-1, account's home region is not set( OperationNotPermitted = 133 ) at ArsenalController.cpp; UnpackRegisterResult; line 321 2021-08-15 03:06:24 info [0xf7195d88] Failure communicating with Arsenal. 2021-08-15 03:06:24 info [0xf7195d88] Caught an exception of type 13CAWSException; what= Registration failed.; Rejecting registration in us-east-1, account's home region is not set( OperationNotPermitted = 133 ) at ArsenalController.cpp; UnpackRegisterResult; line 321; caught at ArsenalController.cpp; CallArsenal; line 885 |
ホームリージョンじゃないとかそんなエラーが出力されています。
|
1 2 |
$ sudo systemctl stop aws-discovery-daemon.service |
ひとまずエージェントを停止しました。
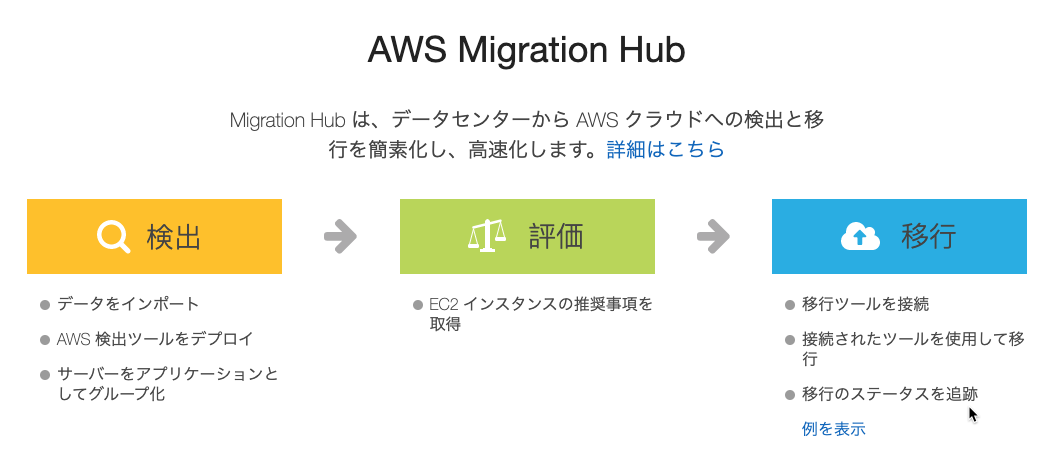
ちょっと調べてみるとAWS Migration Hubにホームリージョンという設定があるようなので設定してみます。
AWS Migration Hubのホームリージョンを確認
まず、東京リージョンのAWS Migration Hubにアクセスしました。
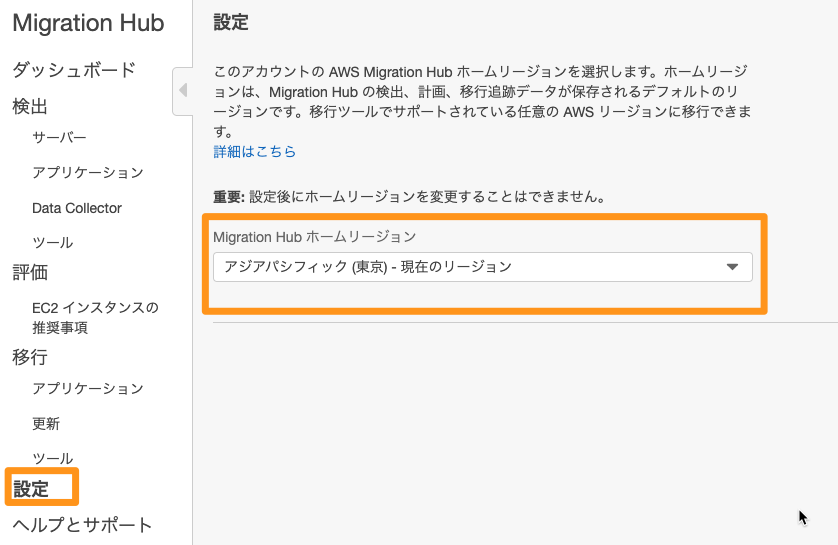
[設定]メニューにありました。
AWS Application Discovery Serviceエージェントの再実行
|
1 2 |
$ sudo systemctl start aws-discovery-daemon.service |
停止していたエージェントを開始しました。
|
1 2 |
$ sudo tail -f -n 100 /var/log/aws/discovery/aws-discovery-daemon-1.log |
ログを見てみます。
|
1 2 3 4 5 6 7 |
2021-08-15 03:38:44 info [0xf722fd88] Arsenal endpoint is "https://arsenal-discovery.ap-northeast-1.amazonaws.com". 2021-08-15 03:38:45 info [0xf722fd88] Registration changed agent ID from to o-2gvbb9k5gz72erpot 2021-08-15 03:38:45 info [0xf722fd88] Storing the internal data at "/var/opt/aws/discovery/internal" 2021-08-15 03:38:45 info [0xf722fd88] Arsenal Controller received stored agent ID of o-2gvbb9k5gz72erpot. 2021-08-15 03:38:45 info [0xf722fd88] Attempting to publish health since agent successfully registered. 2021-08-15 03:38:45 info [0xf722fd88] Publishing agent health. |
成功したようです。
AWS Migration Hubコンソールで確認する

Data Collectorのエージェントに登録されています。
ここでエージェントの状態を確認できますね。
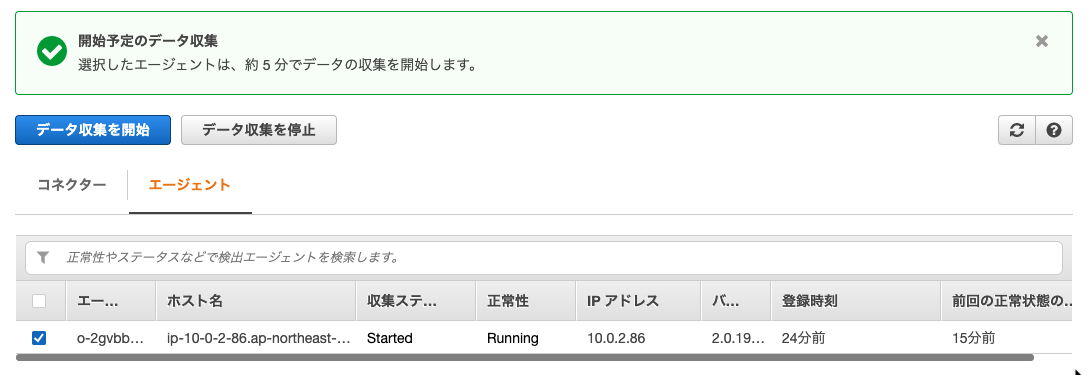
[データ収集を開始]ボタンを押下しておきました。
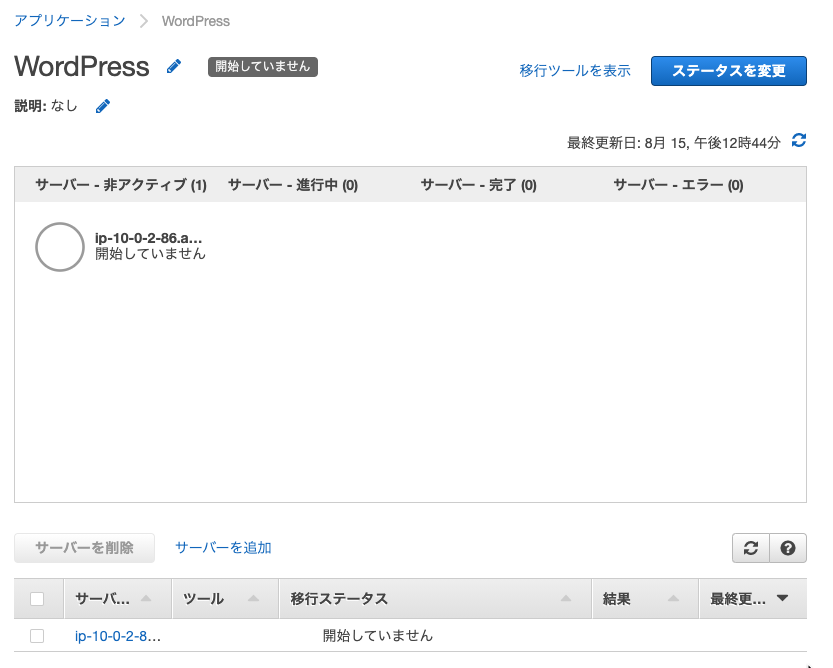
アプリケーションで”WordPress”というのを作成して、検出されたサーバーを選択しました。
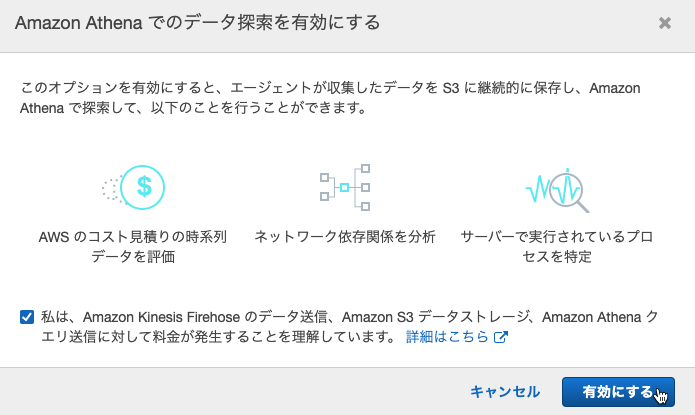
[Athenaでのデータ探索]を有効にしてみました。
データ収集結果を確認
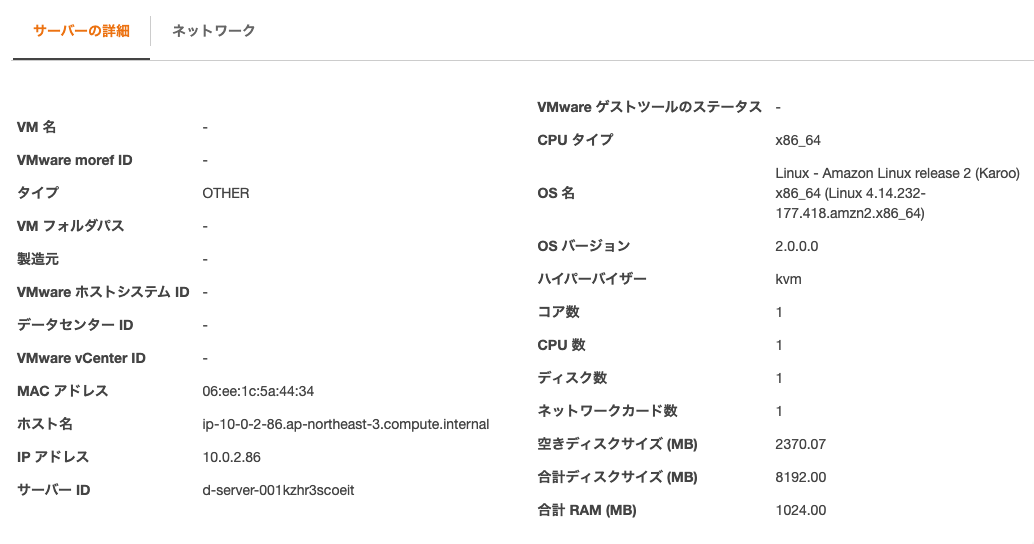
サーバーの詳細です。
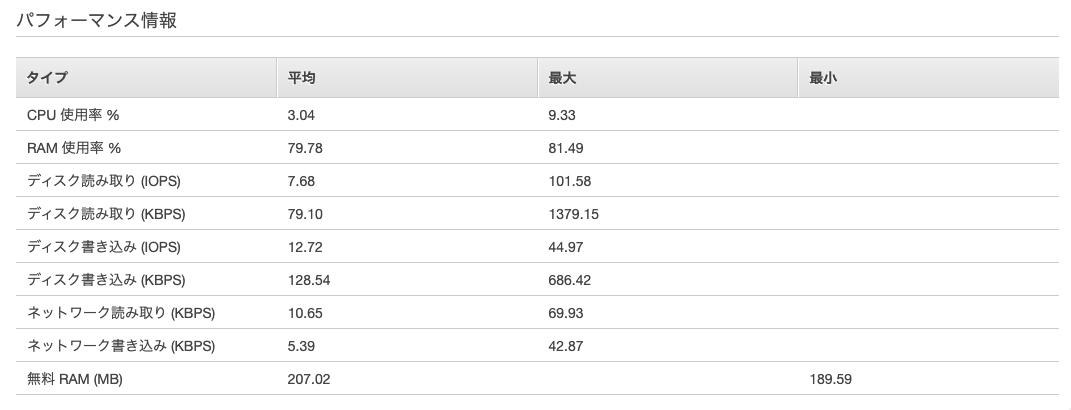
パフォーマンス情報です。
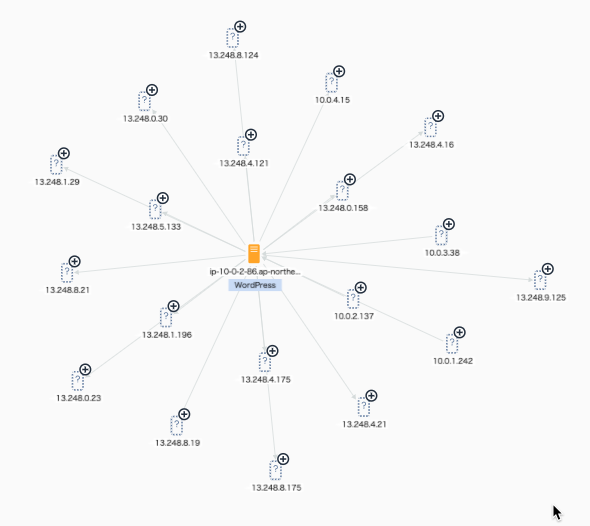
ネットワークもアウトバウンド送信先が自動で検出されています。
(おまけ)エージェントの設定ファイル
/etc/opt/aws/discovery/config
|
1 2 3 4 5 6 7 8 9 10 11 12 13 14 15 16 17 18 19 20 21 22 23 24 25 26 27 28 29 30 31 32 33 34 35 36 37 38 39 40 41 42 |
{ "agentInventoryURL" : "https://s3.ap-northeast-1.amazonaws.com/aws-discovery-agent.ap-northeast-1/linux/latest/CURRENT_RELEASE_V2", "autoUpdate" : true, "awsKeyId" : "XXXXXXXXXXXXXXXX", "awsKeySecret" : "XXXXXXXXXXXXXXXXXXXXXXXXX", "awsRegion" : "ap-northeast-1", "dataCollectionDir" : "", "enableAWSSDKLogging" : false, "loggingLevel" : "", "messageFile" : "", "networkFilesRoot" : "", "proxyHost" : "", "proxyPassword" : "", "proxyPort" : 0, "proxyScheme" : "", "proxyUser" : "", "publishCloudWatchConfig" : { "additionalDimensions" : {}, "awsRegion" : null, "byNic" : false, "enabled" : false, "metrics" : [ "CPUUtilization", "MemoryUtilization", "DiskReadBytes", "DiskWriteBytes", "DiskReadOps", "DiskWriteOps", "NetworkIn", "NetworkOut", "NetworkPacketsIn", "NetworkPacketsOut" ] }, "publisher" : "", "serviceProtocol" : "arsenal", "useAWSCABundle" : false, "verifySSL" : true } |
最後までお読みいただきましてありがとうございました!
「AWS認定資格試験テキスト&問題集 AWS認定ソリューションアーキテクト - プロフェッショナル 改訂第2版」という本を書きました。
「AWS認定資格試験テキスト AWS認定クラウドプラクティショナー 改訂第3版」という本を書きました。
「AWS認定資格試験テキスト AWS認定AIプラクティショナー」という本を書きました。
「ポケットスタディ AWS認定 デベロッパーアソシエイト [DVA-C02対応] 」という本を書きました。

「要点整理から攻略するAWS認定ソリューションアーキテクト-アソシエイト」という本を書きました。
「AWSではじめるLinux入門ガイド」という本を書きました。
開発ベンダー5年、ユーザ企業システム部門通算9年、ITインストラクター5年目でプロトタイプビルダーもやりだしたSoftware Engineerです。
質問はコメントかSNSなどからお気軽にどうぞ。
出来る限りなるべく答えます。
このブログの内容/発言の一切は個人の見解であり、所属する組織とは関係ありません。
このブログは経験したことなどの共有を目的としており、手順や結果などを保証するものではありません。
ご参考にされる際は、読者様自身のご判断にてご対応をお願いいたします。
また、勉強会やイベントのレポートは自分が気になったことをメモしたり、聞いて思ったことを書いていますので、登壇者の意見や発表内容ではありません。
関連記事
-

-
Apple Silicon M1 MacBook ProにAWS CLI v2をインストール
公式手順どおりにインストールしました。 macOS での AWS CLI バージ …
-
-
EC2 セッションマネージャにEC2インスタンスの一覧から接続できるようになりました
EC2に接続する時に、どうしてもSSHクライアントから接続しないといけない場合を …
-
-
AWS CodeDeployからEC2 Auto Scalingにデプロイするチュートリアル
公式チュートリアルチュートリアル: アプリケーションを CodeDeployグル …
-
-
macOSにAWS Schema Conversion Toolをインストール
環境 macOS BigSur バージョン11.5(20G71) MacBook …
-
-
EC2インスタンスWindowsでセッションマネージャーを使う
WindowsのEC2インスタンスでセッションマネージャーを使ってみたことがない …
-
-
Aurora Serverless Data APIを有効にしてQuery Editorを使ってみました
Aurora ServerlessのMySQLでData APIを有効にして作成 …
-
-
IAMユーザーのマネジメントコンソールログインパスワードを変更してDynamoDBに記録するLambda(Python)
やりたいこと IAMユーザーのマネジメントコンソールへのサインインパスワードを動 …
-
-
AWS Expert Online at JAWS-UG首都圏エリアに参加して「Amazon EC2 スポットインスタンス再入門」を聞いてきた
AWS Expert Onlineという勉強会がありまして、AWS ソリューショ …
-
-
WordPressの年ごとのブログ投稿数を調べるSQL
毎年年末に使いそうなのでメモです。 [crayon-69ab8551af4590 …
-
-
AWS Transfer Family EFS向けのSFTP対応サーバー
EFSファイルシステムは作成済です。 AWS Transfer Family S …